
Gitlab Runners, they're pretty cool
The Setup
So the Calico website runs on Hugo, we’ve blogged about that before. However, with non-technical staff and more writers, the manual deployment becomes more cumbersome. Really, this is the downfall of static site generators; however, we also use GitLab, which is an awesome SaaS service for hosting all of your git repositories. Over the last year, GitLab has been doing some pretty cool stuff around deployment automation and CI/CD integration. While we haven’t had time to fully roll out a DevOps practice, our website is small enough to play around with the CI/CD GitLab pipeline.
So to summarize what we have:
A website powered by Hugo
A GitLab repository with our site
That’s basically it
What we want to have:
The ability to commit changes to our GitLab repo
An updated public site with the latest changes
Cat photos for everyone!
If we were to build all the components required for this CD pipeline from scratch this solution would be a non-starter, but with GitLab runners getting things going is a lot simpler. Below is a quick illustration of what we want to actually setup:
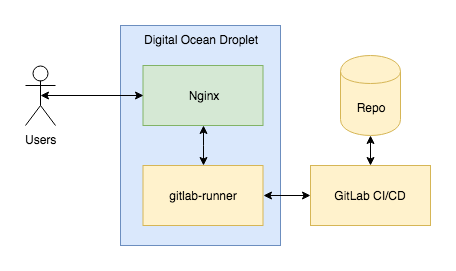
First, Setup the Runner
To get started, we’re going with a basic setup, our web server is going to also run our runner. Yeah I know, phrasing.
To get started, we use a Ubuntu droplet for our server, some of you might be able to guess that we use Digital Ocean for some of our more basic hosting needs. So, get your droplet setup, get the basics going and get Nginx installed.
Get your package repositories updated.
sudo apt-get update
Then get Ngnix installed.
sudo apt-get install nginx
Make sure that Ngnix is started.
sudo service nginx start
At this point, you should have a basic Nginx start page. The rest of this you can lookup in many many hundreds of tutorials out there about Nginx. Maybe we’ll add another one at a later date, but for now, we’ll just assume that Google has got us covered.
The next part is getting a GitLab runner setup on our server. GitLab has awesome documentation, but there are a couple of small gotchas; and really this is what we’re here to talk about.
If you’re running on GitLab’s SaaS platform, you won’t have access to admin/runner and will have to setup a runner specifically for your project. If you don’t, well you’ve probably done this already.
In our case, we go to our project, Settings -> CI/CD and hit Expand on Runners settings. There, you will see under “Setup a Specific Runner Manually” in pink, an access token. Make note of it as this will be important later.
Meanwhile, you will need to add the GitLab package repository. The full details can be found here. However, for the impatient, here’s the summary.
curl -L https://packages.gitlab.com/install/repositories/runner/gitlab-runner/script.deb.sh | sudo bash
Since we’re on Ubuntu, we don’t have to worry about APT pinning, or anything of that sort. After that we can do the familiar apt-get dance.
sudo apt-get install gitlab-runner
At this point we have a GitLab runner installed, and we’re ready for some CI/CD fun!
Getting Things Registered
So the heart of the way GitLab wires stuff is via build pipelines and the pipelines are generally invoked through a config file: .gitlab-ci.yml you could call this file whatever you want and specify that in the project configuration, but we’ll stick with the defaults here.
So let’s get our runner registered. The instructions for registering a runner on GitLab are good. However, there is one piece that was not obvious, at least to me, the authorization token. Remember the section under getting a runner setup manually, the token highlighted in pink is what you need. I hope that saves you a couple of minutes. But basically, all you need to do is run:
github-runner register
and follow the instructions. One thing that we are going to do is add deploy to the tags when we’re asked, also, we’re using the shell executor to keep things simple.
Now we need to get our CI pipeline setup, we do that by adding the .gitlab-ci.yml file to the root of our repository. Here’s what ours looks like for Hugo: Note - we commit our public folder into the repo so in this case all we need to do is copy the contents into a place where our web server can see it.
Anyway, the contents of the file are here for your perusal.
stages:
- deploy

deploy:
  stage: deploy
  environment: production
  script:
  - sudo cp -R ./public/* /var/www/html/
  - sudo chown -R www-data. /var/www/html/
  - sudo service nginx restart
  tags:
  - deploy
  only:
  - master
So let’s break this file down and get to the details. First, we define what we want to do and then we define what each step does. So we define that we have a deploy stage. In the deploy stage we provide a few things that are self-evident but there are some things that were not immediately obvious.
The tag we specified in our runner is how GitLab knows that we want to use that specific runner for this specific stage. You can see that this can be used to create a complex multi-stage pipeline that can use specialized servers for build-test-deploy cycles. Here we don’t have to do that, we just got to copy some files.
So back to the our pipeline. When the pipeline runs, there are a few things that happen. One of the things is that our code gets pulled down into the build directory. This is perhaps obvious to some but it was a bit hard to dig up. However, it turns out that our runner kindly deposits code in the gitlab runner home directory:
/home/gitlab-runner/<runner>/<build>
The most convenient part is that when we specify the commands to run, the runner starts in the build directory. This is why we can copy directly out of the current directory into our /var/www/html folder.
Summarizing it All
At this point we have everything setup. The next time we push into master, the pipeline will use our runner and should deploy our code into our /var/www/html folder and have our web server restart.
A really long way of saying that now we get our code on our web server without actually having to log into the server or do anything.